 |
High School
Teachers at CERN |
 |
|
| WWW.CERN.CH |  |
||
Detecting the Polarity of an Electric Charge
 This experiment may involve high voltages.
 Note the WARNING
given below.
The experiment also involves dismantling a mains testing screwdriver, which should NEVER be used again for its original purpose.
In experiments on electrostatics, we often obtain charge by friction or induction. How do we determine the polarity? Is the static electric charge positive or negative? We can solve the questions with a small neon tube.
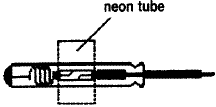
There is an electrician's tool, a test screw driver as sketched in this diagram, that is widely used to test a wire connection. If the neon tube in the pencil glows, the wire is live; if nothing happens, it must be at earth potential.

Take the neon tube from the test pencil, pinch one end between your fingers (earthing that end) and use the other end to touch a charged body. The cold-cathode discharge will occur. If the discharge takes place in the end near your fingers, the charge is positive; if it takes place in the end near the charged body, the charge will be negative, as shown in here.

In this way you can examine the polarity of the charge by looking at the position of discharge.
 WARNING.
 If the charged body's voltage is too high, so that it could be dangerous,
attach the neon tube to a stick (insulating material) and solder a short wire to the tube.
Use the wire to touch the charged body as described, and you can judge the polarity of the charge. There should be no problems with objects charged by friction - but beware the Van der Graaff!!!
Why does this work? There are two reasons. First, for this neon tube, the least voltage that can cause a discharge is 10V or so. Usually in electrostatics experiments a charged body's voltage is more than 1000V. Such an object is always able to make a neon tube discharge. The second reason concerns why we can relate the polarity of static charge with the position of the discharge. If we study the character of a long neon tube, when the glow discharge happens normally, the glow areas are as follows. From cathode to anode we see this eight-part pattern:
- Aston dark space
- cathode layer
- cathode dark space
- negative glow
- Faraday dark space
- positive column
- anode region
- anode layer.
If we shorten the length of the tube gradually, the anode layer disappears, then the positive column, and then the Faraday dark space. If the anode continues to approach the cathode because the tube is even shorter, the negative glow region will shorten until the glow discharge stops. But if you keep the voltage high enough, you will find that it will not stop and you will see the cathode layer.
Because electrostatic voltage is usually very high, and the length of the neon tube is short enough, the cathode layer can always be seen and it usually occurs in the position of low electric potential of the tube. If the charged body is positive, its electric potential is higher than Earth's, and the glow appears in the end near your fingers. Similarly, when the charged body is negative, its potential is lower than Earth's, and the glow will appear in the end near the charged body.
This article (slightly modified for the UK) first appeared in The Physics Teacher, Vol.37, Sept.1999, and was written by Xiang Yong Chen and Xing Wang.