High School Teachers
at CERN
WWW.CERN.CH

TEACHING MATERIALS

VISITING CERN

LINKS & BOOKS

HST


Measuring wavelength with Young's slits

Activity 230E: Experiment

An impressive measurement


The wavelength of light is far too short to be measured directly. Here you use interference phenomena and geometry to measure this very small quantity in your laboratory.

You will need

  • lamp 12 V, 36 W
  •  
  • 12 V power supply
  •  
  • aquadag-coated microscope slides
  •  
  • pin and slit ruling apparatus
  •  
  • two lengths of prepared square-section downpipe
  •  
  • three joints as supports
  •  
  • cardboard collar
  •  
  • ground glass screen
  •  
  • red and blue filters

Looking for fringes

Two-source interference produces fringes. A measurement of the separation of these fringes can be a part of the determination of the wavelength of light used.

  • The numbering in the diagram indicates the order in which you should insert the components.
  •  
    2. Look on the glass screen. If you have two slits that are close enough together and narrow enough then you will see fringes. If no fringes turn up try ruling two more slits on a fresh slide. You are aiming for a pattern as shown above.


    Measuring an average wavelength

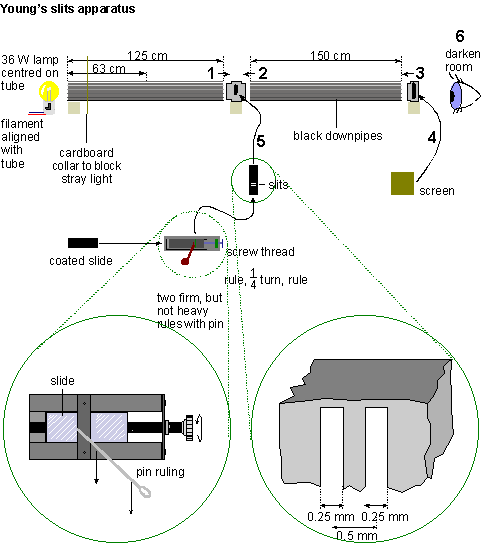
    3. Use an ordinary ruler to measure the separation of the fringes. Also measure the distance from the two slits to the screen.

    4. A little geometry allows you to find the wavelength of light – see the Advancing Physics AS student's book, chapter 6. Question 130X 'Calculating wavelength in two-slit interference' is also available.

    5. Calculate the average wavelength of the light.


    Changing the wavelength

    6. Use filters to repeat the experiment with blue and then red light.

    7. Use the geometry to see why the fringe spacing becomes greater as the wavelength increases.


    You can now

    1. Measure short wavelengths – given sufficiently closely spaced slits that are narrow enough.

    2. Account for the changes in fringe spacing as the wavelength changes.
     

    [NB there is something missing in the picture from the lefthand drainpipe. See the picture in the 'Technician's notes']


  • © CERN and High School Teachers Programme at CERN

    Last modified: 28 June 2002