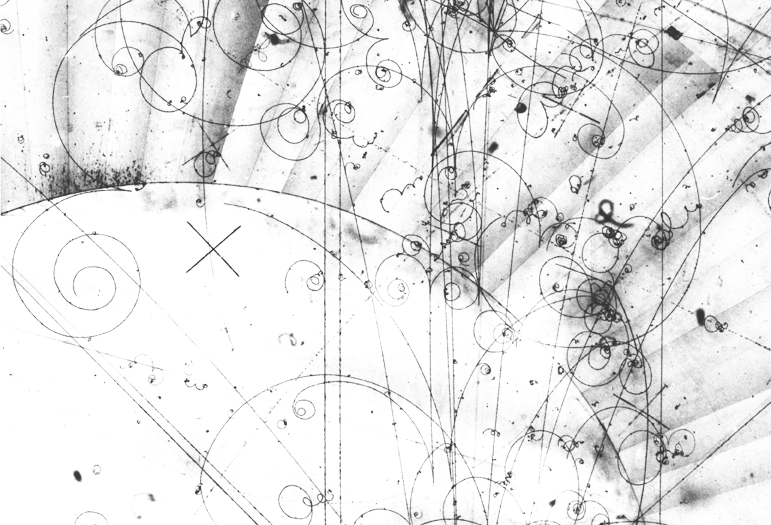
| Fig. 1: Original bubble chamber photo with many events |
|---|
 |
The GIMP is a graphics manipulation program under the GPL (General Public License) and therefore freely available to anyone. It is also available for different computer platforms (actually Windows and Linux). This makes the program attractive for teaching, as students, teachers and schools can use the program legally without cost.
The most welcome feature of the program, with respect to teaching particle physics, is its ability to arrange images in layers, which can be switched on and off and which may carry meaningful names.
Lets assume as an example the following image of a bubble chanber event (Fig. 1).
| Fig. 1: Original bubble chamber photo with many events |
|---|
| |
The overwhelming amount of events inf Fig. 1 prevents an unexperienced user from seeing interesting events. We will now try to see how we can make use of GIMP's features to show one interesting event in the picture.
After loading the original image, some teachers from HST 2002 tracked the elements of different bubble chamber photos and put them into different layers of the image, one track per layer. After tracking the image in different colors, the teachers gave meaningful names to the layers. Fig. 2 shows the Layers window of GIMP with meaningful names of the different layers of the image in Fig. 1.
| Fig. 2: Events are tracked in the GIMP, each on one layer. |
|---|
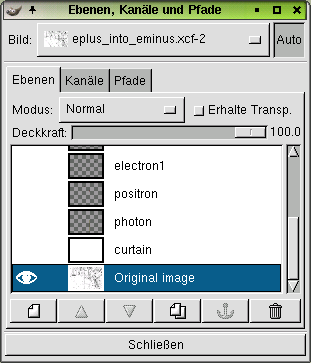 |
In Fig. 2 we have switched off all layers, except the original image layer. This is displaid by the eye symbol on the left of the blue underlied layer of the original image. So the image visible is just like that presented in Fig. 1. This might be the starting position, when a teacher starts over to discuss a real event in a real bubble chamber.
During the course of the discussion of the picture, he might want to switch on one or more layers, to highlight the tracks, which show the corresponding event. The he simply switches on the layers by clicking left of the layers he whishes to show. An eye symbol will appear and in the image the track appears in color. Teachers may also include text layers, which give the track not only a color but also some name or explanation of the engfaged particle.
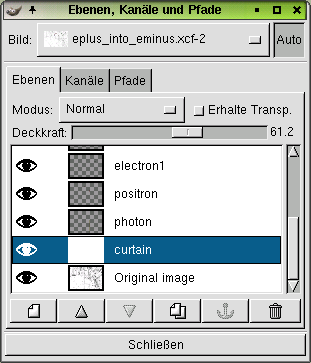
A special layer got the name "curtain" or "fader". This is a white layer, whose opacity has been reduced to about 50%. The only purpose is to separate the original image and make it less visible. So the tracks are still in correlation with the original image, but the background is less dominant and the tracks gain visibility. Fig. 3 shows all layers on, with the curtain set to about 61% opacity..
Fig. 3: All lyaers switched on, with an opacity of the curtain of about 61%. |
|---|
< |
The appearance of the original image in Fig. 1 will now change into Fig. 4.
Fig. 4: The final image of a bubble chamber event, highlighted by different layers. |
|---|
 |