| Fig. 1: Purely leptonic weak interactions. |
|---|
| |
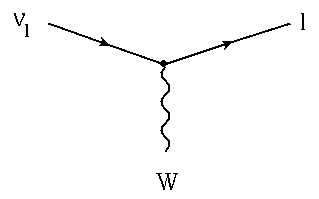
This vertex is used for all allowed interactions between all leptons. It is a prototype in which we replace the neutrino and the lepton l by the corresponding allowed neutrino-lepton pairs as shown in Fig. 2.
| Fig. 2: Allowed interactions between neutrinos and leptons. |
|---|
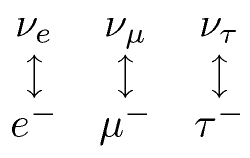 |
Let's take as an example the weak interaction between an electron-neutrino and an electron. Here we replace the neutrino in Fig. 1 by the electron-neutrino and the lepton l by the electron. Fig. 3 shows the corresponding vertex.
| Fig. 3: The vertex of a weak interaction between an electron-neutrino and an electron. |
|---|
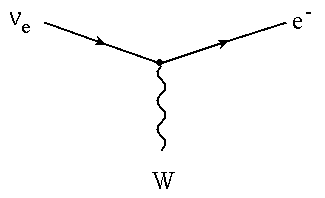 |
As we can see in Fig. 3, the W-Boson is shown without charge. The decision upon its charge is made, after we have rotated the arms of the vertex so, that it corresponds to the interaction we want.
Assume that want to get the vertex for the interaction of an electron neutrino producing an electron and a virtual W-Boson. Then we have to rotate the arms with the arrows only a bit. But as the incoming charge is zero, the W-Boson must carry a positive charge to compensate the charge of the electron. Fig. 4 shows the corresponding procedure and resulting vertex.
| Fig. 4: The arms of the standard electron vertex in Fig. 3 are rotated to give the vertex of an electron-neutrino interacting to produce a pair of an electron and a virtual W+ Boson. |
|---|
 |
Next we consider a positron interacting to produce a pair of antielectron-neutrino and a virtual W+ Boson. Fig. 5 shows the corresponding rotating procedure.
| Fig. 5: The arms of the standard electron vertex in Fig. 3 are rotated to give the vertex of a positron interacting to produce an antielectron-neutrino and a virtual W+ Boson. |
|---|
 |
It is easy to see, that the arms pass over the thin red separation line. When an arm passes over this line, the particle attached to this arm changes to its corresponding antiparticle.
Notice that the arm on the antielectron-neutrino points inwards. This is the convention for writing an antiparticle coming out of the vertex.
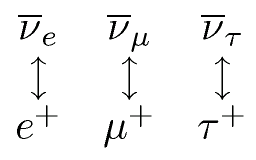
To succeed, you will need to put into the standard vertex in Fig. 1 the antiparticles of the neutrino and the corresponding lepton.
Fig. 6 shows the table of antileptons, between which interactions are allowed.| Fig. 6: Table of antilepton interactions. |
|---|
 |
The needed vertex for a beta+ decay is then received from the standard antielectron weak interaction vertex like shown in Fig. 7.
| Fig. 7: Rotating the arms of a standard antielektron vertex to give the final vertex of a beta+ decay coming out of an atomic kernel. |
|---|
 |
Again you can see, that passing the vertical red line creates an inversion of the engaged particle.
Back to Feynman vertices Back to Index page Next page: the electromagnetic vertices